Category Archives: desserts

Matzo Toffee, aka ‘Matzo Crack’

matzo toffee

Matzo Toffee — so addictive, it’s called Matzo Crack.

“Please, Mom, can I have another piece?” “Just one more piece.” “Really, just one more? Please!!” There’s a reason that this matzo toffee is nicknamed “Matzo Crack.” It is dangerously addictive.

Matzo toffee is made with my three favorite food groups: chocolate, butter and sugar. So right away, you know it’s going to be amazing. Plus, you can make it in minutes for an easy treat for Passover or any time of the year. And it’s simple to make gluten-free by using gluten-free matzo, which actually tastes better than regular matzo. (See my earlier post on gluten-free matzo.)

I first had this addictive treat when my sister-in-law Jonna brought it for Passover one year. (Thanks, Jonna!) We’ve been craving it ever since.

Matzo Toffee, aka “Matzo Crack”

(gluten-free, dairy or pareve, Passover)
By Gluten-Free Nosh
printable recipe

Instructions:

  • 5 pieces gluten-free matzo
  • 2 sticks (1 cup) unsalted butter or Passover margarine
  • 1 cup firmly packed brown sugar
  • 2 cups (12 ounces) semisweet or dark chocolate chips
  • 1/2 cup sliced almonds
  • 1/8 teaspoon sea salt or kosher salt

Method:

  1. Preheat oven to 325 degrees. Line a rimmed 18×13-inch sheet pan with parchment paper.
  2. Arrange matzo pieces in a single layer in the pan, filling the entire pan and leaving as few gaps as possible.
  3. Combine butter and brown sugar in a medium saucepan. Cook over medium heat, until mixture comes to a boil, whisking frequently. Continue cooking and whisking for another 3 minutes until foamy. Carefully, pour toffee over the matzo and evenly spread into a thin layer with a spatula.
  4. Put pan into preheated oven and bake for 10 minutes, or until the toffee is bubbling. Remove pan and immediately sprinkle chocolate chips over top. Let the chocolate sit and melt for 5 minutes, then use a spatula to spread chocolate into an even layer. Sprinkle with sliced almonds and salt. Refrigerate until chocolate is firm, about 30 minutes.
  5. Lift parchment paper with matzo onto a large cutting board. Cut or break into 2-inch pieces. Store in an airtight container in the refrigerator.

Yield: 10-12 servings

Advertisement

Leave a comment

Filed under desserts, Jewish holidays

Apple Pie with Crumble Topping

apple crumb pie

Apple pie with gluten-free crumb topping — a cross between apple pie and apple crisp

Happy Pi Day! With a family of math enthusiasts (especially my husband and my older daughter) and food enthusiasts (pretty much all of us), Pi Day is a lot of fun, celebrated by eating pie, of course. Plus there’s a bonus: today is the ultimate Pi Day–because not only is it 3/14, it is 3/14/15, the first few digits of pi.

While my oldest daughter is into pie/pi, my youngest isn’t as thrilled with either. She just doesn’t love pie, so I make this apple pie with a gluten-free crumb coating — a cross between apple pie and apple crisp — in hopes of tempting her to eat some of it. If you are gluten-free, be sure to use certified gluten-free oats, as regular oats have too much cross-contamination with gluten-containing grains.

If you prefer a traditional pie, feel free to make this apple pie without the crumble topping. Just make the apple filling as directed and dot with 1 tablespoon of butter or dairy-free alternative before placing in the oven. This apple crumb pie can be made gluten-free, dairy-free or vegan (just check the ingredients of your pie crust).

Apple Pie with Crumble Topping, Gluten-Free

(Gluten-free. Can be made dairy-free, vegan, pareve)
By Gluten-Free Nosh
Printable recipe

Ingredients:

Apple pie:

  • 1/4 cup sugar
  • 1 teaspoon ground cinnamon
  • 1/8 teaspoon ground nutmeg
  • 6 large apples
  • 2 tablespoons tapioca starch
  • 1 tablespoon fresh lemon juice
  • 1 (9-inch) unbaked gluten-free pie crust

Crumble Topping:

  • 3/4 cup certified gluten-free oats
  • 1/4 cup packed brown sugar
  • 1/4 cup brown rice flour
  • 1/4 cup tapioca starch
  • 1/4 teaspoon ground cinnamon
  • Pinch of salt
  • 6 tablespoons unsalted butter or dairy-free alternative, diced

Method:

  1. In a small bowl, mix together sugar, cinnamon and nutmeg. Peel, core and thinly slice apples, place in a large bowl and sprinkle with cinnamon-sugar mixture. Stir in tapioca starch and lemon juice. Fill pie crust with apples.
  2. Preheat oven to 375 degrees.
  3. To make the topping, place gluten-free oats, brown sugar, brown rice flour, tapioca starch, cinnamon and salt in a medium bowl; stir to combine. Add diced butter, and work in with a pastry blender or two forks until the mixture resembles coarse crumbs. Crumble topping over pie.
  4. Place in preheated oven and bake about 45 minutes until filling is bubbly.

Yield: 8 servings

1 Comment

Filed under desserts, Recipes

Chocolate Peanut Butter Bark

<a href="https://www.flickr.com/photos/glutenfreenosh/16522429215" title="chcolate peanut butter bark by Eve, on Flickr"><img src="https://farm8.staticflickr.com/7450/16522429215_49308a45cd_b.jpg" width="1024" height="1024" alt="chcolate peanut butter bark"></a>

Swirled chocolate peanut butter bark


My older daughter calls Valentine’s Day, “Chocolate Day,” because that’s mostly how we celebrate the day–with chocolate. Yesterday, I was looking for a easy, gluten-free chocolate treat that I could make as a quick after-school snack. In a matter of minutes, I whipped up this Chocolate Peanut Butter Bark.

I’ve made Dark and White Chocolate Pomegranate Bark before (actually, it was the first recipe on this blog) and ever-popular Peppermint Bark (similar thing, but with crushed candy canes instead of pomegranate seeds). So this recipe is a twist on those favorites.

You’ve got to love a recipe that has only two ingredients, comes together in minutes (other than the refrigeration time and clean-up time), looks fancy, tastes great and is naturally gluten-free.

Note: When you are melting chocolate, make sure the bowl and utensils are dry, without any drops of water. If water mixes with chocolate, the chocolate will seize and become a gunky mess when heated. Also, when using the microwave, heat the chocolate on half-power (not full-power) and remove the chocolate when it is mostly (but not all the way) melted, to prevent overheating. When you stir the chocolate, the residual heat will melt the rest of the chocolate (and if not, pop it back in the microwave briefly at half power).

What are some of your favorite chocolate treats?

Chocolate Peanut Butter Bark

(gluten-free)
By Gluten-Free Nosh
Printable recipe

Ingredients:

Method:

  1. Line a large baking sheet with parchment paper.
  2. Place chocolate chips in a large bowl and microwave on half power (such as 5 out of 10) for 1-1/2 minutes, or until mostly melted. Stir chocolate well to melt the remaining chocolate chips (if not melting, pop bowl back in the microwave briefly). Pour chocolate onto prepared baking sheet and spread thinly with a rubber spatula into a rough rectangle.
  3. Place peanut butter chips in a large bowl and microwave on half power (such as 5 out of 10) for 1-1/2 minutes, or until mostly melted. Stir well to melt the remaining peanut butter chips (if not melting, pop bowl back in the microwave briefly). Pour dollops of melted peanut buter chips on top of the chocolate. Drag the tip of a knife through the peanut butter to swirl it through the chocolate.
  4. Refrigerate for at least 30 minutes, until firm. Cut into bite-sized bark with a large knife. Note that you won’t really be sawing/cutting the bark, but rather I take a large chef’s knife, put both hands on top of it and press down on the bark to break it up.

Yield: 6 to 8 servings

2 Comments

Filed under desserts, Recipes

Spooky Spider Cupcakes

spider cupcake

Happy Halloween!

I made these Halloween spider treats to send in my kids’ school lunch today, using Udi’s gluten-free brownie bites, Betty Crocker decorating icing, Clif Kid ZFruit ropes (cut up for the spider legs), with a couple of chocolate chips and white sprinkles. All gluten-free and easy as can be.

So spooky!

Leave a comment

Filed under desserts

Gluten-Free Passover Meringues

meringues

I’ve posted a couple of variants on meringues, but these were our prettiest yet, deserving of their own post. Plus, these meringue cookies make for a quick and easy gluten-free, dairy-free Passover dessert, requiring no special equipment or ingredients — pretty much just eggs, sugar and a mixer.

When I first started this blog in 2010, I posted a recipe for chocolate-chip and double chocolate meringues, with a really ugly photo, before I learned that you never, ever want to use a flash for food photography. And I also previously posted a recipe for cute ghost meringues for Halloween.

Piping these meringues seemed like a pain, so my daughter and I originally started by scooping spoonfuls of meringue and flinging the sticky meringue onto a baking sheet. But we found out that piping actually was so much easier and prettier. All you need are disposable pastry bags and a large star tip — OK, and some practice piping, because it does take a while to perfect the skill. (I highly recommend taking a cake decorating class if you foresee making a lot of gluten-free birthday cakes or desserts in your future.)

Meringues are true sugar cookies because the main ingredient is, well, sugar. My youngest daughter is crazy for them.

My oldest daughter is trying a low-FODMAP diet to help with her non-celiac stomach issues, so these meringues are a good low-FODMAP dessert. (FODMAPs are types of carbohydrates that are sometimes poorly digested by the small intestine, causing irritable bowel symptoms like pain, bloating and gas when they pass into the large intestine. … Sorry if I just killed your meringue sugar buzz, but it’s good to know about FODMAPs because they will be increasingly in the health news.)

Gluten-Free Passover Meringues

(gluten-free, dairy-free, pareve, Passover)
By Gluten-Free Nosh
Printable recipe

Ingredients:

  • 2 egg whites
  • 1/8 teaspoon cream of tartar
  • 1/8 teaspoon salt
  • 1/2 cup sugar
  • 1/4 teaspoon vanilla extract

Method:

  1. Preheat oven to 250 degrees. Line two cookie sheets with parchment paper and set aside.
  2. Using a mixer, beat egg whites on high speed until foamy. Add cream of tartar and salt, and beat until stiff. Gradually add sugar and continue beating. Beat in vanilla extract.
  3. Put a large star tip on a disposable pastry bag. Fill the bag with the meringue mixture and twist the top to close. Pipe the meringues onto the lined baking sheet.
  4. Bake for one hour. Allow meringues to cool and store in an airtight container.

Yield: About 24 meringue cookies

5 Comments

Filed under desserts, Jewish holidays, Passover, Recipes

Lemon Pound Cake with Strawberry Compote, Gluten-Free and Dairy-Free

lemon pound cake

Lemon pound cake with strawberry compote, gluten-free and dairy-free

This year, I’ve been fortunate to participate in the Kosher Connection, a group of food bloggers who participate in monthly blog challenges. I’ve enjoyed having inspiration (and a kick in the pants) to come up with new, themed recipes. This month, in honor of the Kosher Connection’s first anniversary, we are having a blog swap. Participants were assigned another blog to cook from, and then we could choose to make any recipe on the assigned blog. There’s also a giveaway contest — info is at the end of this post.

I was excited to be assigned the Couldn’t Be Parve blog. Most of Shoshana’s recipes are for desserts, and I absolutely love to bake (and eat) desserts. Also, many of her recipes are gluten-free or have gluten-free substitutions, and all of her recipes are parve, which means they don’t contain dairy or meat.

As you know, my youngest daughter has celiac and is on a strict gluten-free diet. But my oldest daughter (11) has been having stomach problems on and off for the past year. She’s been tested for celiac and doesn’t have celiac. My hunch is that she has a lactose/dairy intolerance. (One doctor said IBS, which kind of ticks me off because that just means, “I have no idea and don’t want to deal with it.”) Anyway, we’ve been trying a dairy-free diet to see if that makes her feel any better. So I was thrilled to see all the great dairy-free recipes on the Couldn’t Be Parve blog.

Even though many of the recipes on the site are gluten-free, I have a perverse need to make things difficult for myself, so I picked a non-gluten-free recipe to make. Her Lemon Pound Cake with Strawberry Rhubarb Compote looked so good that my daughters and my mother unanimously voted for it. We love all things lemon, like my sweet-tart Luscious Lemon Squares.

I subbed gluten-free flours and amped up the lemon. The cake turned out dense, rich and lemony, though my version did fall a little bit in the center. Since I didn’t have rhubarb, I made a strawberry-apple compote, which should be served on the side so it doesn’t soak into the cake too much. Thanks, Couldn’t Be Parve, for the lemony inspiration and great recipe!

Lemon Pound Cake with Strawberry Compote, Gluten-Free and Dairy-Free

By Gluten-Free Nosh
Print this recipe

Ingredients:

Lemon Pound Cake:

  • 1-1/2 cups gluten-free flour blend:
    1/2 cup brown rice flour
    1/2 cup sorghum flour
    1/2 cup tapioca starch
  • 1-1/2 teaspoons baking powder
  • 1/4 teaspoon xanthan gum
  • 2 eggs
  • 1 cup sugar
  • 1/4 teaspoon salt
  • 1/3 cup canola oil
  • finely grated zest of one lemon (about 1 teaspoon)
  • 1/4 cup freshly squeezed lemon juice (about 1 lemon)
  • 3/4 teaspoon pure lemon extract
  • 1/2 teaspoon pure vanilla extract

Strawberry compote:

  • 2 cups strawberries, hulled and sliced
  • 1/4 cup grated apple
  • 1/4 cup sugar

Method:

  1. Line an 8 x 4-inch loaf pan with parchment paper. Whisk together the gluten-free flours, baking powder and xanthan gum in medium bowl. Set aside.
  2. Preheat oven to 350 degrees. In a stand mixer, beat eggs, sugar and salt until light and fluffy, about 3 to 5 minutes.
  3. Decrease speed and beat in canola oil, then mix in lemon zest, lemon juice, lemon extract and vanilla extract. Mix in the flour mixture until combined.
  4. Pour batter into prepared pan and bake for 40 to 45 minutes, or until a tester inserted into the middle comes out with moist crumbs. Remove cake from oven and let cool completely on a rack before slicing. Serve with strawberry compote on the side.
  5. To make the compote, combine strawberries, grated apple and sugar in small saucepan. Cook over medium heat, stirring occasionally, as juice begins to form. Cook until strawberries reduce down and sauce thickens, about 10 minutes.
  6. Remove sauce from heat, cool and refrigerate. Serve on the side, with lemon pound cake.

Yield: 8 to 10 servings

Giveaway Details:

To celebrate the one-year anniversary of the Kosher Connection, we are giving away two prizes from Emile Henry, a Bread Cloche valued at $130 and a 4.2 qt Dutch Oven valued at $170! Two winners will be chosen at random. The contest winners will be contacted via email and will have 48 hours to respond before other winners are chosen. This contest is open to United States residents over the age of 18. Click this link to enter: Rafflecopter giveaway.

Kosher Connection:

KOSHERCONNECTION5
The Kosher Connection, an informal group of creative kosher food bloggers from all around the world, proudly presents our monthly kosher recipe challenge. Each month we will present you with recipes on a different theme from kosher food bloggers.

This month in honor of our one-year anniversary we are celebrating with a blog swap and a giveaway!

Each participant was assigned another person’s blog to make a recipe from, see what everyone chose below. You can also enter to win the giveaway from any of our blog entries. Follow our recipes on Twitter with #KosherRecipes.

Somehow, I can’t get the photos of the participating recipes to show up, but please click the InLinkz link below for the rest of the “Great Blog Swap” recipes. (Please note that not all recipes are gluten-free.)

9 Comments

Filed under desserts, Recipes

Super-Moist Secret-Ingredient Chocolate Cake

Secret-ingredient Chocolate Cake

You’d never guess the secret ingredient in this moist gluten-free chocolate cake with pink buttercream frosting.

Can you keep a secret? This gluten-free chocolate cake has a top-secret ingredient that keeps it rich and moist. No crumbly, dry cake here.

The only catch is that you can’t reveal the secret ingredient to your guests, at least not until after they’ve devoured a piece of this delectable chocolate cake topped with a delicate pink buttercream frosting.

Ready? Promise you’ll keep reading? The secret ingredient is … borscht. That’s right, pureed beet borscht gives the cake extra moisture and richness, without any noticeable beet taste. (Note: Do not use “Russian style” borscht, which contains garlic. That would be bad.)

Honestly, I’m not a huge fan of beets (too “earthy”), so trust me on this one: You simply cannot taste the beets in this recipe, yet they lend moistness, structure and depth to the cake. Similarly, sometimes I add applesauce to my gluten-free cakes: The applesauce makes the cake tender, and the fruit pectin keeps it from falling apart — especially important for gluten-free baking.

When I was asked to develop two recipes for the Joy of Kosher Gold’s Foods campaign, I decided to make two very different recipes: a chocolate beet cake with Gold’s borscht and wild salmon with dinosaur kale and yogurt-horseradish sauce, using Gold’s white horseradish.

For the Super-Moist Secret-Ingredient Gluten-Free Chocolate Cake, you’ll need to puree the borscht in a blender, to thoroughly incorporate any bits of beet. Borscht — beet soup — is liquidy. Adding 1 1/2 cups of borscht to the batter seems strange, but it makes the cake tender, with a light and airy crumb.

chocolate cake ingredients

The surprising secret ingredient to moist gluten-free chocolate cake is … borscht.

I frosted the cake with a pink buttercream frosting, tinted pink by a few tablespoons of pureed borscht. Again, trust me — there is so much sugar in the icing, you will never taste the beets. Using the beet juice is actually a great way to color the frosting without using artificial food colorings.

For the full recipe for Super-Moist Secret-Ingredient Gluten-Free Chocolate Cake, please click through to the Joy of Kosher site.

For the salmon, I came up with a more traditional recipe of Salmon with Dinosaur Kale and Yogurt-Horseradish Sauce. I like lacinato (dinosaur) kale, because it is more tender and quicker cooking than curly kale. My youngest daughter eats up the kale (leaving the salmon), asking for more of “the green stuff.”

Salmon with kale and yogurt-horseradish sauce

Salmon with dinosaur kale and yogurt-horseradish sauce

kale

Lacinato kale is also called dinosaur kale and Tuscan kale.

horseradish sauce

For a sauce, try this combination of Greek yogurt, white horseradish and fresh dill.

Start by sautéing the chopped kale with diced shallots in a large skillet, adding a cup of vegetable broth. Then place the salmon on top of the kale, cover the skillet and cook over low heat for about 10 minutes. The salmon (feel free to use other types of fish) comes out silky and tender, which is good because I tend to overcook fish. For the yogurt-horseradish sauce, mix together 1/2 cup Greek yogurt, 2 tablespoons white horseradish and 1 tablespoon chopped fresh dill, and serve on the side.

With a powerhouse combination of wild salmon, kale and Greek yogurt, this dish is both delicious and nutritious.

For the full recipe for Salmon with Dinosaur Kale and Yogurt-Horseradish Sauce, please click through to the Joy of Kosher site.

This post is sponsored by Gold’s and Joy of Kosher.

2 Comments

Filed under desserts, entrees, Recipes

Strawberry-Vanilla Tart in Macaroon Shell

strawberry macaroon tart

Strawberry-vanilla tart in macaroon shell, gluten-free

Here’s a simple dessert that’s gluten-free and kosher for Passover. Use macaroons to make a crisp tart shell, top with a quick vanilla pudding and layer with sliced strawberries. With only a little bit of effort you’ll have an elegant strawberry-vanilla tart in a macaroon shell — perfect for this month’s Kosher Connection challenge to create a Passover dessert.

I strongly recommend making the dessert in a tart pan, not a pie dish. When I first made it in a pie dish, it didn’t cut into pretty slices. With a tart pan, you can remove the sides and keep the tart on the pan’s metal base, or you can slide a knife under the tart and transfer it to a serving plate. One other caveat: After it’s been cut into, this tart does not keep well because the pudding seeps out. So once you start it, it’s best to finish it that day.

The recipe is gluten-free and kosher for Passover. If you want to make a dairy-free strawberry macaroon tart, omit the pudding, pile the macaroon crust full of sliced strawberries and brush the top with melted strawberry jam.

Strawberry-Vanilla Tart in Macaroon Shell

(gluten-free, kosher for Passover)
By Gluten-Free Nosh
Print this recipe

Ingredients:

  • 1 (10-ounce) can macaroons
  • 4 tablespoons (1/4 cup) butter, melted
  • 1/4 cup sugar
  • 2 tablespoons potato starch
  • 1/8 teaspoon salt
  • 2 cups whole milk or half-and-half
  • 1 tablespoon pure vanilla extract
  • 3 cups sliced strawberries

Method:

  1. Preheat oven to 350 degrees. Lightly grease the bottom of a 9-inch tart pan with removable sides.
  2. Chop macaroons finely in a food processor. Pour in melted butter and process until crumbs start to come together. Press macaroon crumbs into bottom and sides of the tart pan. Put the tart shell on a baking sheet, slide into the oven and bake at 350 degrees for 12 to 15 minutes, until firm.
  3. For the vanilla pudding, mix together sugar, potato starch and salt in a medium saucepan. Pour in a small amount of the milk (about 1/4 cup) and whisk to form a smooth paste. Pour in the rest of the milk and stir well.
  4. Cook pudding over medium heat, stirring constantly with a rubber spatula, until it thickens and bubbles around the edges, about 5 minutes. Remove from heat and stir in vanilla extract. Let pudding cool for 5 minutes, then pour it into macaroon tart shell while still warm. Top with sliced strawberries arranged in concentric circles and refrigerate.

Yield: 8 servings

For more Passover desserts, check out this month’s Kosher Connection link-up. Please be aware that not all desserts listed are gluten-free. Click on the frog icon for links to other great blogs:

15 Comments

Filed under desserts, Jewish holidays, Passover, Recipes

Fudgy Cream Cheese Brownies and Three-Cheese Eggplant Roll-Ups

fudgy cream cheese brownies

Fudgy, flourless cream cheese brownies, gluten-free

eggplant rollatini

Three-cheese eggplant roll-ups, gluten-free

While the rest of the community whines about giving up wheat on Passover, we gluten-free cooks have it pretty easy. We’re used to cooking without wheat and looking for creative alternatives to grains. While others try to make food with matzo meal, we stay away from the tasteless stuff. This frees us to be more creative with grain-free recipes that taste great during Passover and year-round, like these gluten-free flourless, fudgy cream-cheese brownies and three-cheese eggplant roll-ups.

On Passover, one of my favorite products is Temp Tee Whipped Cream Cheese — it’s airy, fluffy and spreads easily on matzo, especially on fragile gluten-free matzo that crumbles easily. I usually buy several containers (so does my neighbor Dani, who buys 10 Temp Tee tubs to last well after Passover). So when Temp Tee and Joy of Kosher asked bloggers to create recipes with Temp Tee cream cheese, I jumped at the chance. (Check out all the recipes at Joy of Kosher’s “matzah fatigue” page.)

I recently created fudgy, flourless brownies that not only are gluten-free but also are kosher for Passover. I ramped up the “wow” factor by adding a rich cream cheese swirl, using fluffy Temp Tee Whipped Cream Cheese.

To counter the sweets, I came up with gluten-free eggplant rollups (or eggplant rollatini, if you want to sound fancy) with a three-cheese filling of cream cheese, cottage cheese and mozzarella cheese.

But let’s start with the sweets, since that’s the best part.

choc chips and butter

First some prep: Place 1/2 cup semisweet chocolate chips and 6 tablespoons butter in a microwave-safe bowl and microwave on half-power for 1 minute, or until melted. Stir until well-combined and set aside to cool a bit.

Then line an 8×8-inch baking pan with parchment paper, extending up the sides of the pan. This will come in handy later, when you lift the brownies out of the pan to cut them. (One of my favorite baking tips.)

brownie ingredients

With your mixer (or by hand), beat 2 eggs and 3/4 cup sugar until combined. Slowly mix in melted chocolate. Then add 1/4 cup potato starch, 1/4 cup unsweetened cocoa powder, 1/4 teaspoon salt and 1 teaspoon pure vanilla extract and mix well. Stir in 1/2 cup semisweet chocolate chips, because don’t you think we need more chocolate? And then spread the batter into the baking pan.

Now it’s time to preheat your oven to 350 degrees. While it’s heating, wash out your mixing bowl and make the cream cheese topping. Beat 8 ounces whipped cream cheese with a mixer. Add 1/4 cup sugar, 1 egg and 1 teaspoon pure vanilla extract and mix until it’s all smooth and creamy, with nary a lump.

cream cheese swirl

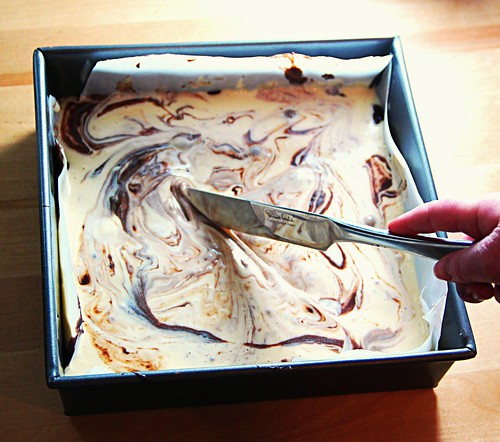
Pour the cream cheese mixture on top of the brownie batter. Drag a knife through the batter several times to create a marbled design. (You may need to dredge up some thick brownie batter from the bottom to get a good marbled effect.)

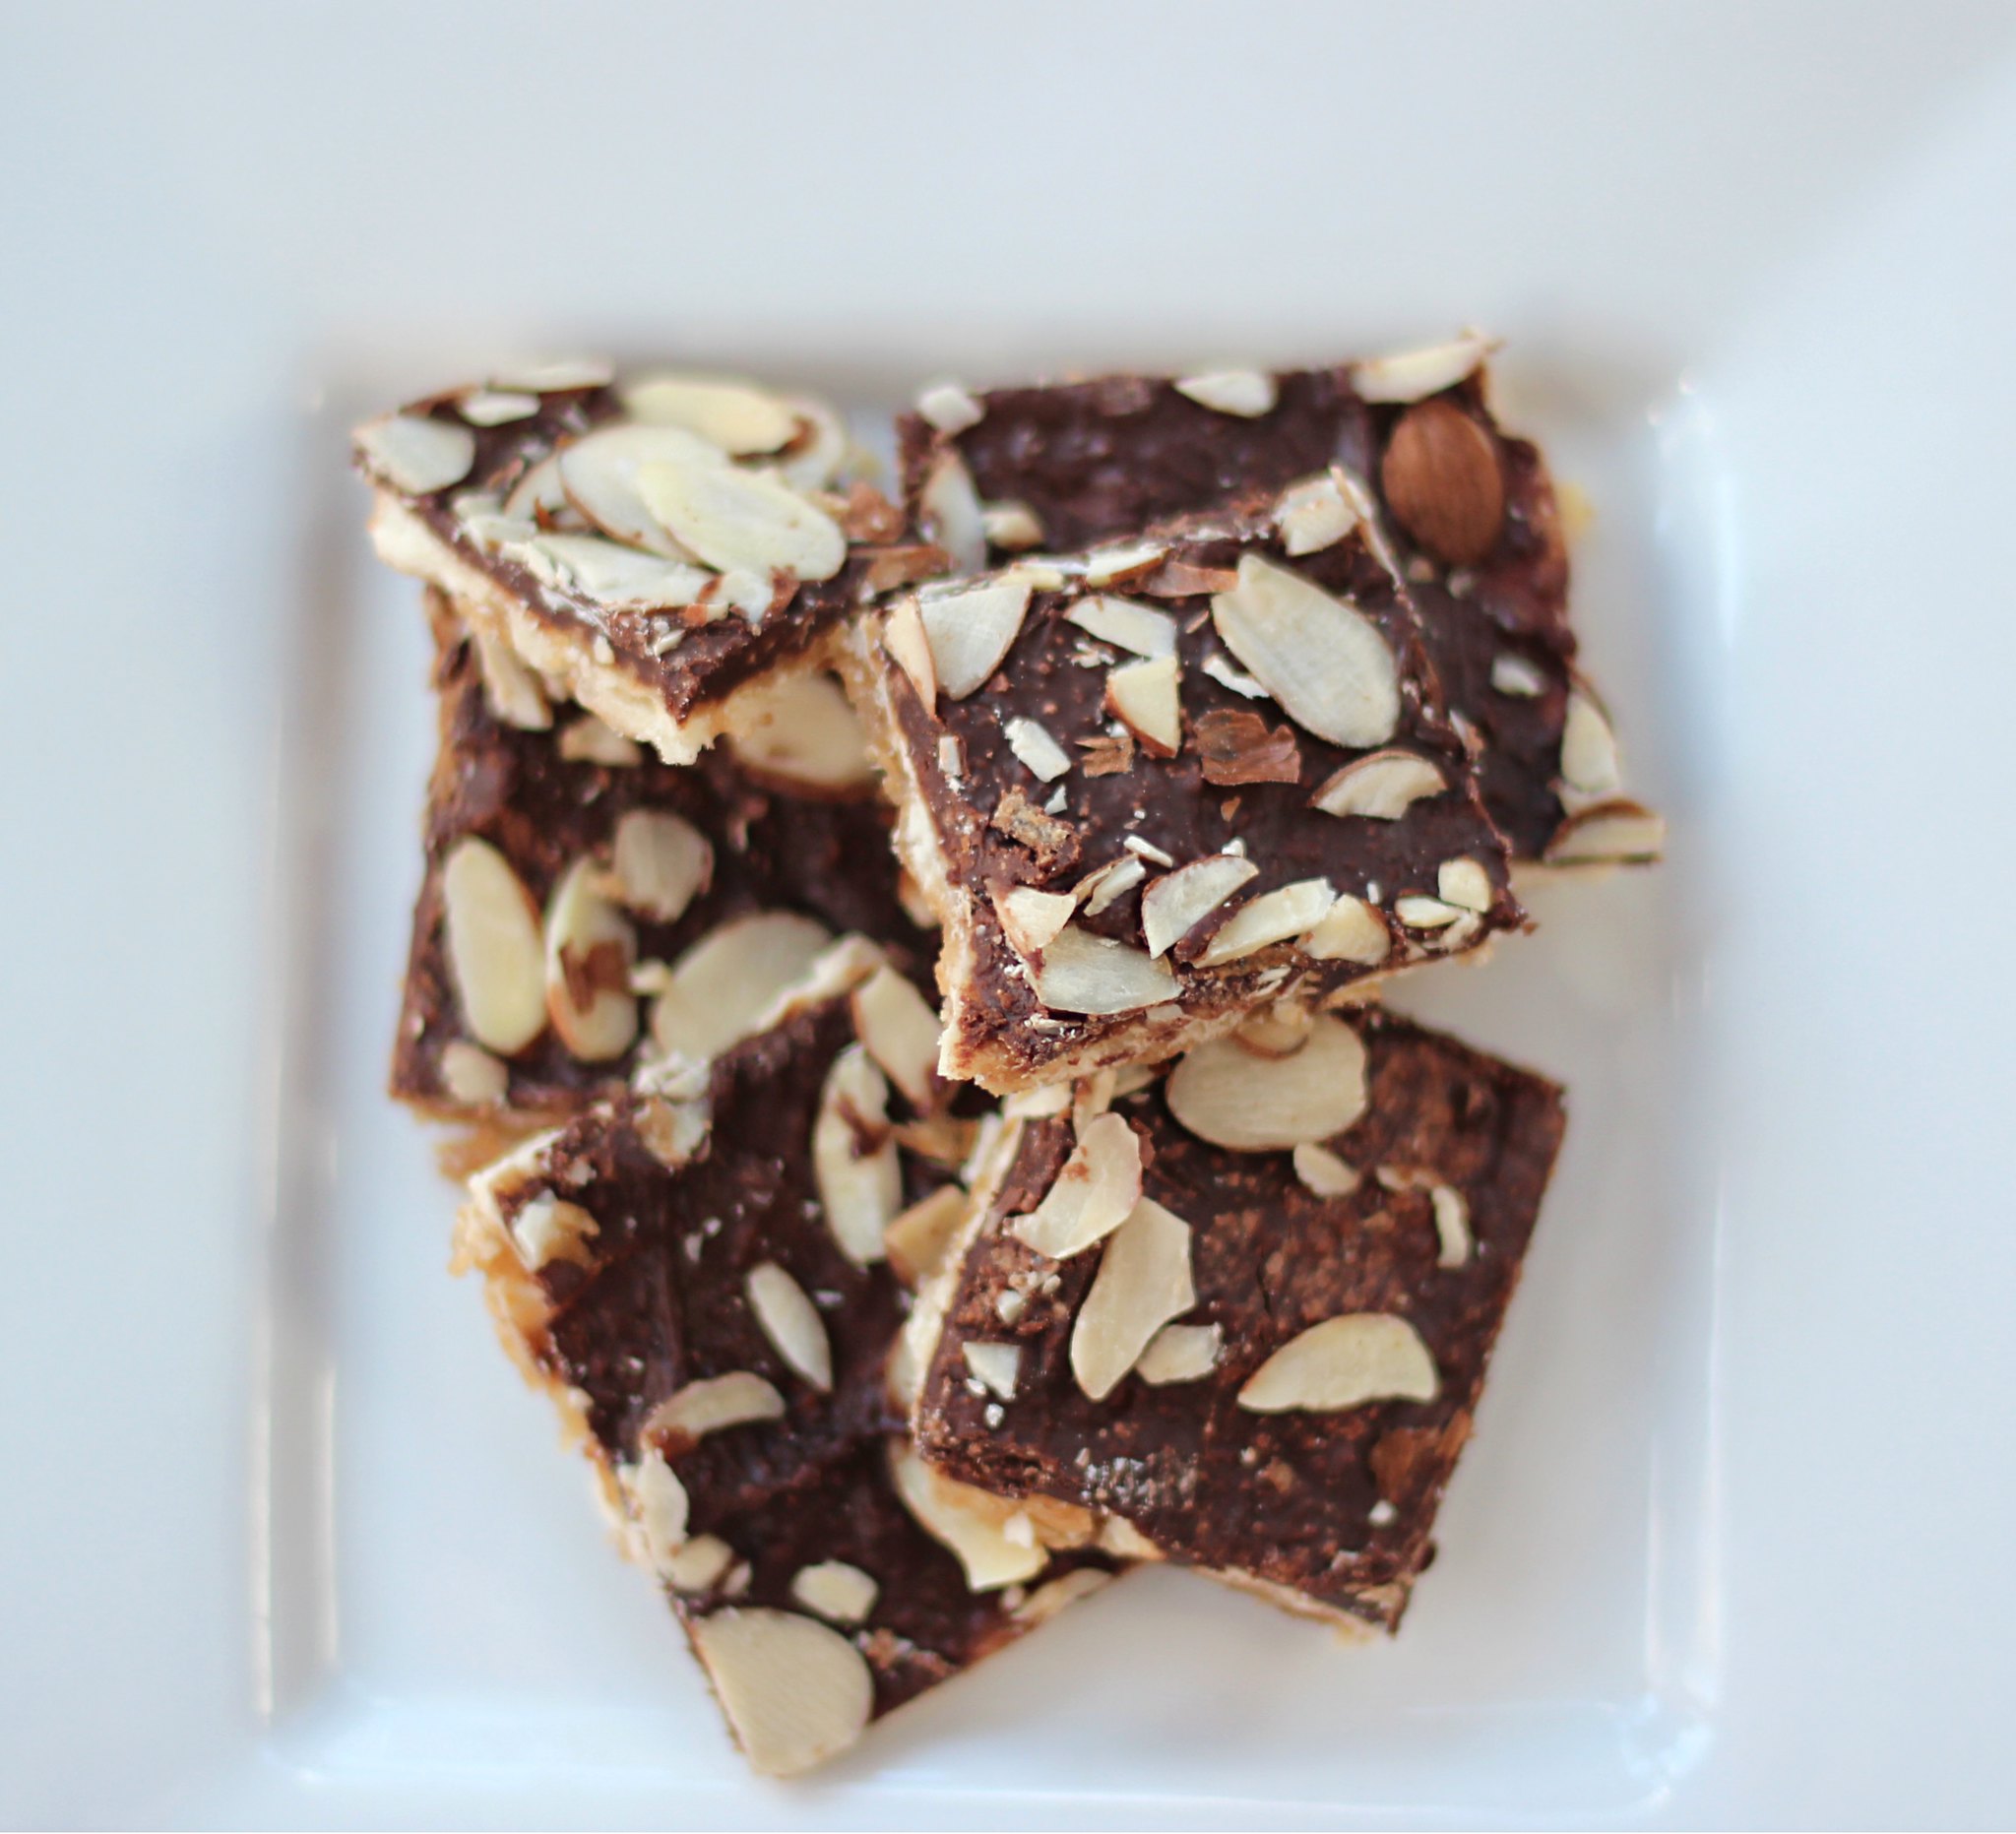
Bake for 35 minutes until the brownies feel firm to the touch and a toothpick inserted into the middle comes out clean. Cool completely in the pan (or refrigerate) so they’ll be easier to cut. When cool, lift the brownies out of the pan by the edges of the parchment paper. Place the parchment paper on a cutting board and cut the brownies into 25 squares.

Now on to the three-cheese eggplant roll-ups. Wasn’t it fun to have dessert before dinner?

eggplant

For the eggplant roll-ups, preheat the oven to 375 degrees and cut 2 medium eggplants into thin slices. Trim the top and lop off the bottom of the eggplant, so it can stand up on the cutting board without wobbling. Cut the eggplant lengthwise into slices that are 1/8- to 1/4-inch thick. Now we’ll need to soften the eggplant, so put the eggplant on baking sheets lined with aluminum foil. Brush the eggplant with some olive oil and sprinkle with salt and pepper. Bake until the eggplant is soft and lightly browned, about 10 minutes.

In a medium bowl, mix 1 egg, 1/2 cup whipped cream cheese, 1/2 cup small-curd cottage cheese (low-fat is fine), 1/4 cup shredded mozzarella cheese, 1 teaspoon dried basil, 1 teaspoon dried oregano, 1/4 teaspoon salt and 1/4 teaspoon black pepper until well-blended.

rollups

Spread 1 cup of marinara sauce to cover the bottom of a 9 x 13-inch baking dish. Place a spoonful of the cheese filling at the bottom edge of each eggplant slice and roll up. Lay rolls seam side down in the baking dish, placing the rolls close to each other. Pour 1 cup marinara sauce over top of the rolls and sprinkle with 1/4 cup shredded mozzarella. (If you like a little spice, you can sprinkle 1/4 teaspoon crushed red pepper flakes over the top.) Cover the baking dish with aluminum foil and bake at 375 degrees for about 25 minutes, or until the sauce is bubbling.

For the complete printable recipes see the Joy of Kosher website:

Fudgy cream-cheese brownies

Three-cheese eggplant roll-ups

This post is sponsored by Temp Tee and Joy of Kosher.

7 Comments

Filed under desserts, Recipes

Brown Sugar Blondies, Gluten-Free and Dairy-Free

blondies

Gluten-free, dairy-free blondies, with dark chocolate chips

A confirmed chocoholic, I always figured, why have a blondie, when you can have a brownie (especially my recipe for the best gluten-free brownies ever)? But these gluten-free, dairy-free brown sugar blondies tossed that theory out the window.

These blondies taste like chocolate chip cookies, but they are more moist and more cakey. Studded with dark chocolate chips, the blondies still deliver a strong chocolate dose, proving that maybe blondes do have more fun.

I made the blondies dairy-free by using coconut oil and applesauce, instead of a stick of butter. Be aware that the chocolate chips sink to the bottom forming a chocolatey crust; next time I will try mini chocolate chips to see if I have better luck keeping the chips afloat.

This month’s Kosher Connection challenge (see links to other blog posts below) was to make treats for mishloach manot baskets for Purim. On Purim, we have a tradition that’s the opposite of trick-or-treat: Instead of emphasizing getting food, we give friends and family gifts of food — usually a basket with at least two different kinds of foods. I thought the blondies would make a good Purim treat — dairy-free, nut-free and studded with a chocolate surprise. Also, check out my tasty, tender gluten-free, dairy-free hamantaschen recipe.

Click for Gluten-Free, Dairy-Free Blondies recipe

17 Comments

Filed under desserts, Recipes